Contents
As you step into your attic, envision a space transformed into a cocoon of warmth and energy efficiency. Attic insulation installation involves careful planning and execution to ensure ideal outcomes. From preparing the attic space to sealing air leaks and choosing the right insulation material, each step plays a pivotal role in enhancing your home’s comfort and reducing energy costs. But what specific steps do you need to take to achieve this goal? Let’s explore the key elements of attic insulation installation to lead you through this essential home improvement process.
Key Takeaways
- Measure the attic for accurate insulation estimation.
- Choose insulation type based on needs and budget.
- Seal gaps with caulk and weatherstripping.
- Properly install insulation for energy efficiency.
- Ensure ventilation for a balanced attic environment.
Preparing the Attic Space
Before you start installing attic insulation, it’s crucial to thoroughly prepare the attic space. Begin by measuring the space accurately to determine how much insulation material you’ll need. Safety precautions are essential. Make sure you have proper ventilation and wear protective gear like gloves, goggles, and a mask to prevent inhaling insulation fibers.
Clear the area of any debris, dust, or pests. Fix any leaks or damage to the roof to prevent moisture issues that could compromise the insulation’s effectiveness. Seal any gaps or cracks in the attic to prevent air leaks that could reduce insulation efficiency.
Moreover, ensure the attic is adequately ventilated to prevent moisture buildup that can lead to mold and mildew. Install baffles to maintain proper airflow between the insulation and the roof decking.
Arrange your tools and materials in the attic before you begin to avoid unnecessary trips up and down. Create a clear pathway to move around safely. If the attic has limited space, consider using a pulley system to lift insulation materials.
Assessing Insulation Needs
To properly address your attic insulation needs, the initial step involves evaluating the current insulation situation in your attic space. Conducting a thorough insulation evaluation is vital to determine if your attic has sufficient insulation levels to ensure energy efficiency and proper temperature regulation in your home. Proper installation is key to maximizing the efficiency of your insulation and reducing energy costs.
When evaluating your attic insulation needs, consider factors such as the type of insulation currently installed, its condition, and the overall insulation levels. Insulation should be evenly distributed throughout the attic space and free from any gaps, compression, or damage that could compromise its efficiency. Additionally, it’s crucial to check for any signs of moisture or mold, as these issues can indicate insulation problems that need to be addressed before proceeding with installation.
If your current insulation is inadequate or damaged, removing and replacing it with new insulation may be necessary to ensure peak performance. Proper installation techniques are essential to achieving the desired insulation levels and maximizing energy efficiency in your home. Whether you choose to install batt, blown-in, or spray foam insulation, following manufacturer guidelines and best practices for installation is necessary for long-term insulation effectiveness.
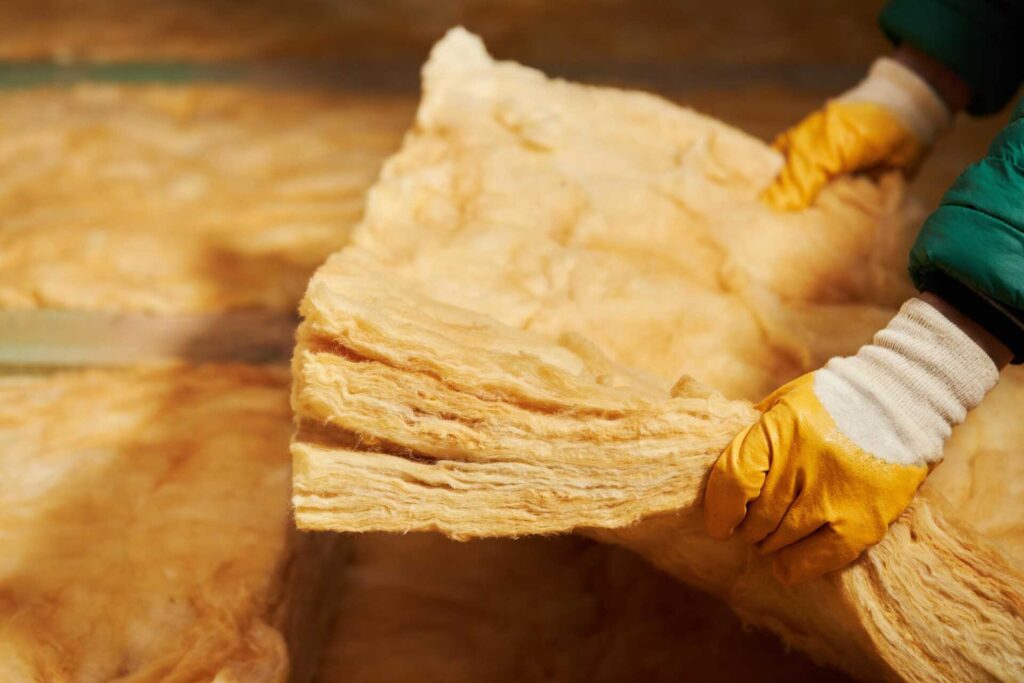
Choosing the Right Insulation Material
When selecting the ideal insulation material for your attic, it’s important to weigh your options carefully. Factors such as R-value, moisture resistance, and ease of installation should be considered to ensure maximum effectiveness. By evaluating these considerations, you can make an informed decision on the best insulation material to suit your specific needs.
Insulation Material Options
When evaluating insulation material options for your attic, it’s essential to choose the most appropriate type based on factors such as R-value, material longevity, and installation requirements. Cost comparison is pivotal, as some materials may be pricier initially but offer significant energy efficiency benefits in the long term.
Fiberglass and cellulose are popular selections because of their cost-effectiveness and decent R-values. Furthermore, take into account the environmental impact of the material. Materials like recycled denim insulation or spray foam may be more eco-friendly.
Durability is another crucial aspect to keep in mind; materials like spray foam insulation have a lengthy lifespan compared to others. Reflective foil insulation is superb for reducing radiant heat transfer.
Also, bear in mind the installation process; some materials necessitate professional installation, while others can be DIY projects. By carefully considering these factors, you can select an insulation material that best fits your attic’s requirements, striking a balance between cost, energy efficiency, environmental impact, and durability.
Considerations for Effectiveness
Considerations for selecting the right insulation material for your attic are crucial to ensure maximum effectiveness and energy efficiency. When choosing the insulation type, prioritize energy efficiency to lower utility costs and reduce environmental impact. Insulation materials like fiberglass, cellulose, or spray foam offer varying levels of effectiveness and cost efficiency, so consider your budget alongside the desired benefits.
Fiberglass insulation is a popular choice due to its affordability and decent insulating properties. Cellulose insulation, made from recycled paper, provides good thermal resistance and can be a sustainable option. Spray foam insulation, while more costly, offers superior energy efficiency by creating an airtight seal.
Consider the environmental impact of your chosen material; opt for eco-friendly options if sustainability is a top priority. Additionally, some insulation materials may contribute to better indoor air quality, providing health benefits by reducing allergens and pollutants in your home.
Making an informed decision based on energy efficiency, cost efficiency, environmental impact, and potential health benefits will ensure your attic insulation effectively enhances your home’s comfort and efficiency.
Sealing Air Leaks and Gaps
To effectively seal air leaks and prevent gaps in your attic insulation, start by inspecting for any visible cracks, holes, or openings where air might be escaping.
Use caulking or weatherstripping to seal gaps around windows, doors, and other openings.
Additionally, consider using expanding foam insulation to fill larger voids and secure a more airtight seal.
Seal Gaps Effectively
Inspecting your attic for gaps and air leaks is an essential step in ensuring the effectiveness of your insulation installation. To seal gaps effectively, you’ll need to master caulking techniques and utilize weather-stripping applications.
Begin by identifying any visible cracks, holes, or openings in the attic where air may leak. Use a high-quality caulking material to seal these gaps, ensuring a tight and durable seal. Apply the caulking evenly and generously to cover the entire gap.
Weather stripping can be highly effective for larger gaps or openings around windows, doors, or vents. It comes in various forms, such as adhesive foam, felt, or V-seal weather stripping. Choose the appropriate type based on the size and location of the gap. Apply the weather stripping carefully to create a barrier against air infiltration.
Prevent Air Leaks
An important aspect to focus on for effective insulation installation in your attic is sealing air leaks and gaps. Properly preventing air leaks is vital for enhancing energy efficiency and achieving cost savings. Here are some key steps to help you prevent air leaks effectively:
Identify Leaks: Start by locating potential air leaks in your attic. Common areas include around pipes, ducts, electrical wiring, and framing.
Seal Gaps: Use caulking or weather-stripping to seal any visible gaps or cracks. This will prevent warm air from escaping in the winter and cool air from leaking out in the summer.
Insulate Recessed Lights: Verify that recessed lights are properly insulated to prevent air leakage around them.
Check Attic Access: Make sure the attic access door or hatch is properly insulated and sealed to prevent air from entering or escaping.
Installing Vapor Barrier (If Needed)
Before proceeding with the attic insulation installation, it’s important to evaluate whether a vapor barrier is necessary for your specific situation. A vapor barrier is a material used to prevent moisture from seeping into the insulation, which can lead to mold, mildew, and decreased insulation effectiveness. In regions with cold climates, vapor barriers are typically recommended to control moisture levels and maintain the efficiency of the insulation.
To install a vapor barrier, start by identifying the type of barrier needed based on your climate and insulation materials. Common vapor barrier options include plastic sheeting, foil-faced insulation, or specialized vapor barrier paint. Make sure that the vapor barrier is installed on the warm side of the insulation, usually facing the interior of the house.
Properly sealing all seams and edges of the vapor barrier is vital to prevent moisture from penetrating. Use tape or caulk to secure the barrier in place and create a continuous seal.
Additionally, be cautious not to puncture or tear the vapor barrier during installation to maintain its effectiveness.
Installing Insulation Properly
To ensure peak energy efficiency and thermal performance in your home, it’s essential to install insulation correctly. Proper insulation installation enhances energy efficiency and also results in significant cost savings over time. Here are some key points to keep in mind when installing insulation:
Insulation Varieties: Understanding the various kinds of insulation available, such as fiberglass, cellulose, or spray foam, can help you select the most suitable option for your attic based on factors like R-value and cost-effectiveness.
Cost Factors: While upfront costs may differ depending on the insulation type and installation method, investing in high-quality insulation can lead to long-term energy savings that surpass the initial expenses.
Energy Conservation: By ensuring that insulation is installed correctly and uniformly throughout the attic space, you can create a thermal barrier that minimizes heat transfer, thereby enhancing the overall energy efficiency of your home.
Economies: Appropriately installed insulation reduces energy consumption by maintaining a stable indoor temperature, which also results in lower utility bills, offering you tangible savings in the long term.
Ensuring Ventilation and Air Flow
Proper airflow and air circulation are critical components to consider when maximizing the effectiveness of attic insulation. Ventilation solutions play a key role in maintaining a balanced environment within your attic space. Without sufficient airflow, moisture can build up, leading to mold growth and reduced insulation efficiency.
To promote adequate airflow management, consider installing soffit vents to allow cool air to enter the attic and ridge vents to let warm air escape. This ensures a continuous flow of air that helps regulate temperature and moisture levels.
In addition to soffit and ridge vents, gable vents can also be used to improve ventilation. These vents are placed on the exterior walls of the attic to encourage air circulation. By strategically positioning these ventilation solutions, you can prevent the accumulation of heat and moisture, thereby extending the lifespan of your insulation.
When handling air flow, it’s crucial to inspect existing vents for any blockages or damage. Clear debris and obstructions to maximize ventilation throughout the attic space. By maintaining proper airflow and air circulation, you can enhance the overall efficiency of your attic insulation and create a more comfortable and energy-efficient home environment.
Inspecting and Cleaning Up
During the inspection and cleaning up phase, your focus should be on evaluating the current condition of the attic and addressing any potential issues that may impact the insulation system.
Insulation Removal: Before installing new insulation, it’s important to remove any old or damaged insulation materials. This step ensures that the new insulation can perform effectively without any hindrances.
Mold Prevention: Inspect the attic for any signs of moisture or mold growth. Mold can pose serious health risks and compromise the effectiveness of the insulation. Address any moisture issues and clean up any mold present before proceeding.
Check for Pest Infestations: Look for signs of pest infestations such as droppings, chewed wires, or nests. Pests can damage insulation and create entry points for them to enter your home. Take necessary steps to eliminate pests and seal off any entry points.
Clearing Debris: Remove any debris or clutter in the attic that may obstruct the insulation installation process. Clearing the space will ensure a smooth and effective installation of the new insulation.
Summary
Now that you have completed the attic insulation installation process take a moment to visualize the energy efficiency and comfort that awaits you. Picture a well-sealed attic space, properly insulated, to create a thermal barrier and prevent air leaks. With the right insulation material and proper installation techniques, you can enjoy a more energy-efficient home and long-term cost savings. Ensure proper ventilation and maintenance to maximize the benefits of your newly insulated attic.
Recent Posts
Top Attic Air Sealing Techniques for Insulation
Have you ever considered how much energy might be wasted through unnoticed gaps in your
Top 10 Attic Air Sealing Techniques for Insulation
Just as a tightly sealed ship avoids leaks and remains buoyant, your attic’s air sealing
What Are the Best Attic Air Sealing Techniques?
When it comes to attic air sealing, understanding the common leakage points is vital for