Contents
Optimize your home’s energy efficiency and comfort with our expert solutions for efficient roof insulation.
In ‘Self-Install Efficient Roof Insulation: 7 Key Tips,’ you’ll discover practical advice to upgrade your insulation. From choosing the right materials to sealing air leaks, this guide empowers you to take control of your home’s comfort and energy usage.
With these tips, you’ll be able to create a cozier living space while also reducing your energy bills.
So, let’s get started on your journey to a more efficient and comfortable home!
Key Takeaways
- Assess attic conditions and identify existing insulation, air leaks, and ventilation to determine the roof insulation needs.
- Consider R-Value comparison, climate conditions, cost, and durability factors when choosing the right insulation material.
- Consider regional considerations and climate-specific needs when selecting insulation materials, such as fiberglass and cellulose.
- Install vapor barriers, seal air leaks and gaps, and ensure adequate attic ventilation for effective roof insulation and moisture control.
Assessing Attic Conditions
Assessing your attic conditions involves checking for existing insulation, identifying any air leaks, and evaluating the overall ventilation. Proper ventilation is crucial for maintaining good air quality and controlling moisture in your attic space. Inadequate ventilation can lead to moisture buildup, compromising the structural integrity of your roof and insulation. It’s important to ensure that your attic has proper airflow to prevent moisture-related issues and maintain your insulation’s thermal performance.
When assessing your attic, pay close attention to moisture control. Excess moisture can lead to mold growth and wood rot, impacting your home’s energy efficiency and safety. Proper insulation placement is also essential for energy efficiency. Make sure there are no gaps or compressed areas in the insulation, as these can significantly reduce its effectiveness.
In addition to energy efficiency, consider the safety precautions associated with your attic space. Ensure there are no exposed wires, and be mindful of any potential tripping hazards. It’s also important to be cautious when walking in the attic to avoid accidentally stepping through the ceiling below.
Choosing the Right Insulation Material
When choosing the right insulation material for your roof, it’s crucial to consider the R-Value comparison of different options.
Additionally, consider the specific climate conditions in your area to ensure the insulation material is well-suited for your needs.
Cost and durability factors should also be carefully weighed to make an informed decision.
Material R-Value Comparison
To choose the right insulation material for your roof, compare the R-values of different options to determine their effectiveness in conserving energy and providing thermal resistance. It’s crucial to consider various insulation material considerations when considering insulation options such as fiberglass vs foam. Here’s a comparison of the R-values for different insulation materials:
| Insulation Material | R-Value per Inch |
|---|---|
| Fiberglass | 3.0-4.0 |
| Foam Board | 3.8-8.0 |
| Spray Foam | 3.5-7.0 |
| Cellulose | 3.2-3.8 |
| Mineral Wool | 3.0-3.3 |
Understanding the R-values of these materials will help you decide which type of insulation is best for your roof. Next, let’s explore climate-specific insulation choices to enhance your understanding further.
Climate-Specific Insulation Choices
By considering your climate, you can effectively choose the right insulation material for your roof, building on the comparison of R-values from the previous section. Installation challenges and regional considerations are crucial in determining the most suitable insulation for your specific climate.
For example, materials with higher R-values may be needed in colder climates to provide adequate thermal resistance, while in warmer climates, the focus may be on heat flow resistance. Fiberglass and cellulose insulation are commonly used in various climates due to their versatility and effectiveness. Additionally, it’s important to consider insulation materials with built-in moisture resistance in regions prone to moisture or humidity.
Understanding these regional considerations can help you select the most appropriate insulation material for your climate. Now, let’s delve into the cost and durability of different insulation materials.
Cost and Durability Factors
Considering your budget and long-term needs, you’ll want to evaluate the cost and durability of different insulation materials to choose the most suitable option for your roof.
Regarding cost considerations, keep in mind that the initial investment in insulation material will impact your budget, but it’s crucial also to consider the long-term energy savings it can provide.
Additionally, installation methods play a significant role in the insulation’s cost and durability. Proper installation ensures maximum effectiveness and longevity of the insulation material.
Here are some factors to consider:
- Initial cost vs. long-term savings
- Durability and maintenance requirements
- Impact of installation methods on effectiveness and longevity
Calculating Insulation R-Value
When calculating the insulation R-value, start by determining the thermal resistance of the materials you plan to use in your roof. The insulation thickness plays a crucial role in its ability to resist heat transfer. Thicker insulation generally provides higher R-values, indicating better-insulating properties. To calculate the R-value of a specific insulation material, divide its thickness by the thermal conductivity of the material. Thermal conductivity is the measure of a material’s ability to conduct heat. The higher the R-value, the greater the insulating effectiveness and resistance to heat flow.
To calculate the overall R-value of your roof insulation, you’ll need to consider all the layers of insulation and their respective R-values. For instance, if you have two layers of insulation with R-values of 4 and 6, the total R-value would be the sum of both, which is 10. It’s essential to ensure no gaps or compressed areas in the insulation, as these can significantly reduce its effectiveness in preventing heat transfer.
Understanding how to calculate insulation R-value will help you make informed decisions about the most efficient insulation for your roof. Once you’ve calculated the R-value, you can move on to the next step: sealing air leaks and gaps. By properly sealing these areas, you can further enhance your home’s energy efficiency and maximize the benefits of your insulation.
Sealing Air Leaks and Gaps
To seal air leaks and gaps effectively, start by identifying potential sources of air leakage in your roof and attic space. Look for areas where different materials meet, such as where the walls meet the ceiling, around chimneys, plumbing vents, electrical wiring, and recessed lighting. Use a combination of caulk, weatherstripping, and foam sealant to address these potential air leaks and gaps.
When sealing air leaks and gaps, pay close attention to the following key areas:
- Attic Hatch: Ensure that the attic hatch or door is properly insulated and weather-stripped to prevent air leakage between the attic and the living space.
- Ductwork: Seal any leaks or gaps in the ductwork to prevent air from escaping into the attic space, which can contribute to energy loss.
- Recessed Lighting: Use airtight, IC-rated fixtures for recessed lighting to minimize air leakage and improve energy efficiency.
By addressing these areas of potential air leakage, you can significantly improve your home’s energy efficiency. Not only will proper air sealing help reduce energy costs, but it will also create a more comfortable living environment by minimizing drafts and temperature variations.
Additionally, improving the air sealing in your home contributes to a more sustainable and environmentally friendly living space, which can provide a sense of fulfillment and belonging within your community.
Installing Vapor Barriers
When installing vapor barriers, it’s important to understand the different types and their specific functions.
You’ll want to ensure proper installation techniques to prevent moisture from entering your home.
Pay attention to the details and make sure the vapor barrier is properly sealed to maximize its effectiveness.
Vapor Barrier Types
Choosing the appropriate vapor barrier type and installing it correctly can prevent moisture from entering your roof’s insulation. When considering efficient roof insulation, remember that vapor barriers come in different materials, such as polyethylene, foil-faced kraft paper, and aluminum. Each type offers specific benefits, so selecting the one that suits your climate and insulation needs is crucial.
Additionally, properly seal all seams and joints to create a continuous barrier against moisture. Lastly, consider consulting with a professional to ensure that the vapor barrier is installed in accordance with the best moisture control strategies for your specific roof and climate. This will help you achieve optimal insulation performance and protect your home from potential moisture damage.
Proper Installation Techniques
Start by ensuring that the vapor barrier is positioned on the warm side of the insulation layer to control moisture effectively. This step is crucial for efficient installation and preventing condensation within the insulation.
When installing the vapor barrier for efficient roof insulation, seal all the joints and edges properly to create a continuous barrier. Use high-quality tape or adhesive to secure the seams and connections. Additionally, be careful not to puncture or tear the vapor barrier during installation.
When cutting the vapor barrier, leave some extra material to overlap and cover any gaps.
Finally, inspect the entire insulation area to ensure that the vapor barrier is properly installed and that no openings could compromise its effectiveness.
These insulation techniques will help you achieve a well-sealed and efficient vapor barrier installation.
Ventilating the Attic Space
To ventilate the attic space effectively, ensure air can flow freely through vents in the roof and eaves. Proper attic ventilation plays a crucial role in maintaining the integrity of your home and ensuring energy efficiency. Here are some key tips to help you ventilate your attic space for optimal moisture control and overall performance:
- Install Vents in the Roof: Consider installing ridge vents along the roof’s peak to allow warm, moist air to escape. These vents work with soffit vents to create a continuous air flow through the attic, preventing moisture buildup.
- Utilize Soffit Vents: Soffit vents are installed along the roof’s eaves and allow cool, dry air to enter the attic, displacing the warm, moist air. This balanced airflow helps regulate temperature and humidity levels in the attic, reducing the risk of mold and mildew growth.
- Consider Attic Fans: In areas where natural airflow may be insufficient, attic fans can be installed to improve ventilation. These fans help expel hot air from the attic, promoting air circulation and preventing moisture-related issues.
Proper attic ventilation not only aids in moisture control but also extends the lifespan of your roof and reduces the strain on your HVAC system. Ensuring adequate airflow contributes to a healthier and more energy-efficient home environment.
Ensuring Safety Measures
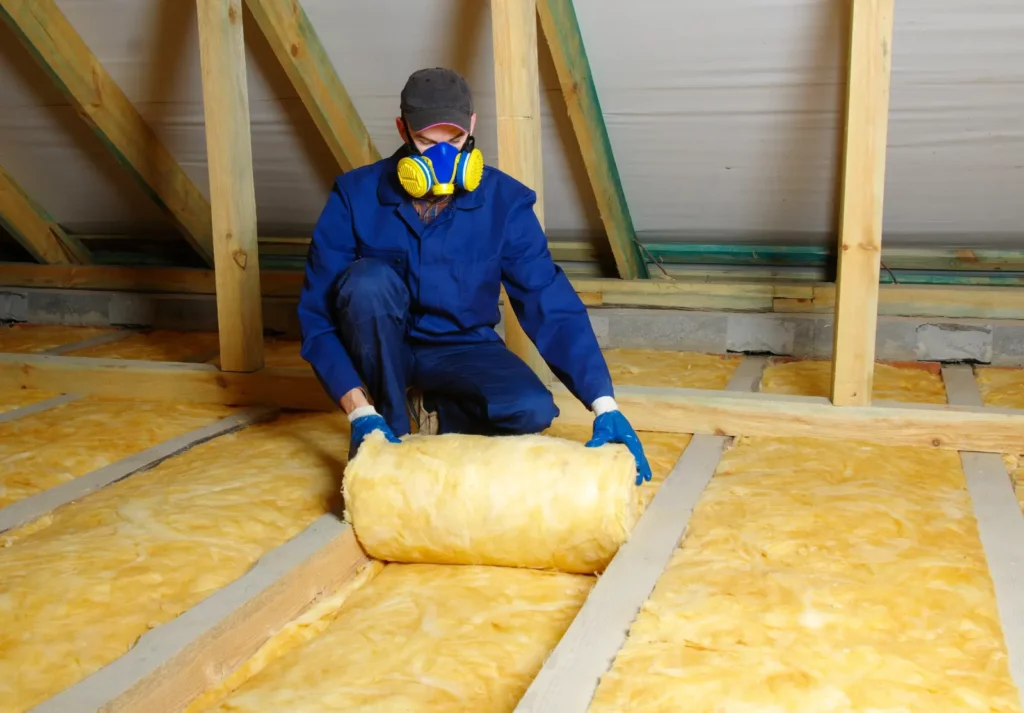
Ensure efficient roof insulation with proper safety measures during installation to prevent accidents and injuries. Prioritize safety precautions throughout the process, wearing protective gear like gloves, safety glasses, and a mask. Ensure a well-lit and clear work area to minimize the risk of tripping or falling.
Before beginning the installation process, familiarize yourself with efficiency standards and best practices for roof insulation. This includes understanding the recommended R-value for your specific climate and ensuring that the insulation material meets or exceeds these standards. Adhering to these guidelines guarantees that your insulation will effectively regulate indoor temperatures while reducing energy consumption.
Take extra precautions to avoid accidents when working in the attic or roof. Ensure the attic space is well-ventilated and the roof stable and structurally sound. Be mindful of your surroundings, especially when maneuvering around rafters and accessing tight spaces. Always work with a partner to provide assistance and enhance overall safety.
Frequently Asked Questions
Can I Use the Same Insulation Material for My Attic as I Do for My Walls and Floors?
Yes, you can use the same insulation material for your attic as you do for your walls and floors.
It’s important to consider the insulation types suitable for each area and ensure proper installation.
Consistent insulation throughout your home can help maintain a comfortable environment and improve energy efficiency.
Be sure to follow the recommended installation process for each area to maximize the effectiveness of the insulation.
How Do I Know if I Need to Add More Insulation to My Attic in the Future?
In the future, to assess if you need more attic insulation, monitor your energy bills and indoor temperature consistency. If your bills are higher or some rooms feel colder, it may be time for an upgrade.
Also, check the current insulation’s condition for signs of wear and tear. Planning for future upgrades ensures your home’s comfort and energy efficiency.
What Is the Best Way to Ensure Proper Ventilation in My Attic Space?
To ensure proper ventilation in your attic space, creating an airflow that rivals a hurricane (hyperbole) is crucial.
Start by installing soffit and roof vents to promote air circulation. This prevents moisture buildup and keeps your insulation working efficiently.
Don’t forget to seal any gaps or cracks to maintain a consistent airflow.
Proper attic ventilation controls moisture and maintains a healthy, energy-efficient home.
Are There Any Specific Safety Measures I Should Take When Working With Insulation in My Attic?
When installing insulation in your attic, safety precautions are crucial.
Before working, ensure proper ventilation and wear protective gear like gloves and a mask. Avoid contact with skin and eyes, and be cautious with sharp tools. Watch out for hazards like electrical wires and unsecured flooring.
Additionally, consider the type of insulation you’re using and follow manufacturer instructions for safe handling.
Your well-being is a top priority when handling insulation installation.
How Do I Know If I Have Sealed All Air Leaks and Gaps in My Attic Properly?
Use a smoke pen or incense stick on a windy day to check for air leaks. Watch for smoke movement, indicating drafts.
Also, inspect areas where different materials meet, like the attic floor, electrical wires, and plumbing vents. Seal gaps with caulk or foam.
Then, ensure proper insulation efficiency by measuring the R-value. Use a ruler to check insulation depth and address any lacking areas.
Summary
Efficient roof insulation is achievable through a comprehensive approach. Assess attic conditions, choose the right insulation material, calculate R-value, seal air leaks, install vapor barriers, ventilate the attic, and prioritize safety measures for a successful self-installation.
These key tips will help you save energy, reduce heating and cooling costs, and create a more comfortable living environment.
So, get started and enjoy the benefits of a well-insulated roof!
Recent Posts
8 Best Tools for Attic Insulation Removal
When it comes to attic insulation removal, having the right tools is crucial. From the
Best Tools for Attic Insulation Removal Process
You know the feeling of finding a hidden treasure in an unexpected place, like stumbling
Top Tools for Attic Insulation Removal Safety
When it comes to removing insulation from your attic, safety should be your top priority.